Greetings!

"Welcome to the ramblings of another artist's adventures."

Wednesday, September 2, 2020

I was going through my notes from school and I ran across this quote which I thought was applicable for the times: 

"...we are all fellow travelers...We are in this together, there is no therapist and no person immune to the inherent tragedies of existence. Sharing the essence of the human condition becomes the bedrock of the work of the existential psychotherapist." 

Focus on the here and now, and awareness of the present moment...that is the key.

an existentialist view from-                                                                                                                         Wedding, D. & Corsini, R., (2013). Current Psychologies (10th ed.).  Belmont,CA : Brooks/Cole

During these stressful times of COVID, it is important to remember to stay present and focus on what we know. There is so much uncertainty that it makes it easy to spiral into the depths of the unknown, the uncontrollable vortex of life leading and fueling anxiety. It is paramount to remember that others share the same existence with you on this unknown journey, you're not alone.

Below are a couple art pieces that I did using the acrylic pour method. For me, this method is an exercise in relinquishing control and letting things happen as they might. Something that is often challenging for me to do-let go of control. This process forces one to rely on gravity and the science of liquid and movement across a flat surface.  It is somewhat manipulative, but I impress, SOMEWHAT.
During times of uncertainty where control is scarce, this may be a good form of creativity. The results/image continue to change as the paint oozes across the canvas until it finally dries, solidifies. I especially enjoy watching the colors mix, change, and witness cells surfacing due to the science of oil and water dancing together in the paint.
The process itself is quick, it does however, take a while to dry, offering a lesson in patience.
As a therapeutic tool, it offers a path into the unconscious invoking thoughts as one meditates over the images both after and during the process.


Swimming in the Turbulence of Life. (2019)
by DJWhitney
Acrylic & Resin, 9x12 canvas


Unconscious Garden. (2019)
 by DJWhitney 
Acrylic & Resin , 9x12 canvas


Tuesday, September 1, 2020

 two days in a row...

Thinking again about creations that have occurred lately. During these days of COVID, it is a great opportunity for creativity to happen since the daily requirements of work are at a minimum. 

Since COVID, sadly my book club has been unable to meet. It didn't stop our ongoing plan of starting a free library which had been in the works. It is finally coming to fruition. I was one of three who volunteered to paint one of the panels. Vincent Van Gogh's Starry Night was an inspiration. I'm looking forward to seeing the finished product.

I plan to build a free library at my home as well. I just love the concept. People put anything from books to canned goods in them. I love the community spirit that it fosters.

Do you have a COVID project?

wedding dress fun

So, as I sit trapped in bed after foot surgery and stuck home due to COVID, I found myself going through paperwork etc. I remembered, oh yeah, I have a blog!  Funny. When I logged on, I found this draft: beginning with-
Wow, It's been five years.  I didn't realize that much time has gone by since I last signed on.  I laughed, as now two more years have passed with no blogging. Maybe I should just give up. No, I'm not a quitter. So, at a minimum, I will complete the blog I started two years ago. 

My artistic endeavors have been on hold due to work and life. I suppose my biggest and most challenging one was the creation of my daughter's wedding dress, while simultaneously going to graduate school, writing a thesis and working full time. Just saying that makes me tired. I am still pinching myself that it all really happened.

Making a wedding dress was never anything I ever really considered doing, even though I had sewn all my life. It wasn't my plan. It just happened, I threw out the option on our way to try on wedding dresses. After my daughter tried on some dresses, and was approached by other girls wanting to try on the dress she was wearing, it happened, "OK, mom you can make my dress". I thought to myself, "did I just say I was making her dress?" Yep. 
I was so nervous that it wouldn't meet her expectations. I had to let that go. I was doing this!

It was an awesome daunting project which took a year to design and create. We started it Dec. 2016 for her wedding in Jan. 2018. It was a collaboration with her ideas and mine. The theme was "speak easy"/ 20's style. 
I ordered books, quizzed other knowledgeable seamstresses and began. I made a mock-up dress from muslin to get sizing before we cut into the silk. My Christmas gift that year was a dress form (something I had always wanted, a perk for the job). 
It was a learning experience, a labor of love, and truly a lot of fun. It was a great excuse for my daughter to come visit every month and spend the weekend with me (a part I especially loved). My dining room became the sewing room (fortunately I have a large table).  The dress became the table cloth, which we had to keep covered to keep the cats from using it as a napping spot.  We listened to hours of books on tape, like the Rook and Harry Potter as we hand sewed tons of beads and sequins. We spent hours deciding over what we wanted the lines to look like, how to curve them, and incorporate the lace. The dress comprised of an under-dress of champagne pink satin with the top, three layers of silk, organza, netting and tulle for a little fluff. We hand stitched lace and beads and covered the buttons to match. 
It was a fete trying to acquire the desired lace at a reasonable price. As luck would have it, a local fabric store was closing, so I was able to find what we needed. It was early in the process so figuring out the quantity was tricky. And my daughter was not in town with me, so I was taking a lot of photos and texting them to her as I looked for hours through all the lace, searching for just the right design.  
Another challenge was padding the dress form to mimic the size of my daughter.  I got a form that would accommodate both our figures, but getting the padding in the right places was challenging. After a lot of measuring, rearranging pads, and stuffing, we were moving along. 
Another concern was making sure that the dress was dance proof, no slippage, or showing excessive cleavage, so strapless was out. So, how to incorporated straps, keep the low back  and yet allow for a bustier to support a large bosom. When we came up with a design that was pleasing, we got to work again. I pinned the straps on the form to check the layout before I sewed them with the machine.  I used tea to dye the organza more of a skin color. It took a few tests tries to figure out the right amount of time to leave it in the tea for the desired colored. I altered her bustier to accommodate the straps of the dress. I sewed hooks inside and attached them to the bustier for extra security.


It was challenging keeping everything straight and together during cutting, sewing and beading. I basted the layers together. I found more is better in that regard. We used a pen that disappeared after a few hours (as long as it wasn't ironed) for marking lines etc. Worked great for marking our bead lines. Of course we did a sample before we started to be sure. Since there was no way to get any more lace pieces, we had to carefully plan where they would go. We spent hours laying them out, moving them around, then back again. We used pearls, sequins, glass crystal beads and seed beads.
 
Our vision was appearing before our eyes. 
It was exciting. 
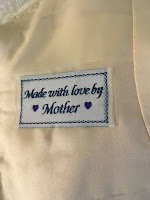
My special touch...                 
We kept it hidden from on lookers until the big day. So, classy!
The day finally arrived, and it turned out awesome!

8 yards plus of scalloped lace finish the bottom hem. That involved fray-checking the silk layers as I trimmed and hand-sewed the lace to form the edge. Painstaking, but we loved the look.


This was taken after we pinned up the bustle, the one thing that we did not get a chance to try before the big day. We were thrilled that it worked. Next time (hah, no!) I would make the loops slightly tighter, as a couple came lose during twirls on the dance floor. Otherwise, it worked out great.I hid the buttons in the lace panels on the hip. They blended in perfectly.
A project of a life time that I will cherish forever, along my with my beautiful daughter!